近々画像解析関連のお仕事を引き受けるかもしれないということで、ひとまずOpenCVを使った画像解析を今一度おさらいすることにしてみました。自分の場合、OpenCVがまだバージョン2の頃に多少触れたことがあったのですが、ほとんど忘れてしまっていたので、復習のためのいい機会となりました。やっぱりOpenCVは難しいですが、面白いですね。というわけで、今回はその備忘録として、基本的な部分のみ記事としてまとめてみることにします。
画像解析アルゴリズムを理解するためには、数学や機械学習の専門的な知識がないと難しいのですが、ひとまずこの記事では、顔や目の検出を実行するサンプルコードをまずは動かしてみよう!というコンセプトで解説をしていきたいと思います。
今回はPython3 + OpenCVを使いますが、Macにおける環境構築から説明していきたいと思います。OpenCVの導入方法については、いく通りかやり方があるかと思いますが、pipで導入するのが一番簡単そうなので、今回はpipで行います。環境が整ったら、顔認識のためのサンプルコードを書いて早速、顔と目の検出を試みてみたいと思います。
目次
- python3のインストール
- pipのインストール
- openCVのインストール
- 顔の検出
- 目の検出
- まとめ
1. Python3のインストール
特に理由がなければPython3を使うことにしているので、まずはPython3のインストールから。公式サイトからインストーラをダウンロードすれば簡単にインストールできます。インストーラーはGUIアプリケーションなのでここでは説明は省きます。
Download the latest version for macOS
https://www.python.org/downloads/
2. pipのインストール
macOSにはpipが導入されていないので、pipもインストールしておきましょう。curlコマンドでインストーラーを入手して実行します。
curl https://bootstrap.pypa.io/get-pip.py -o get-pip.pyダンロードが完了したら実行します。
python3 get-pip.pyちゃんとインストールされたでしょうか?
pip -V or which pip
pip 21.3.1 from /Library/Frameworks/Python.framework/Versions/3.10/lib/python3.10/site-packages/pip (python 3.10)
このようなレスポンスがあればインストール完了です。
3. OpenCVのインストール
pip install opencv-python
pip install opencv-contrib-python2行目の「opencv-contrib-python」は拡張モジュール群です。ついでにインストールしておきたいと思います。
python3 -c "import cv2; print( cv2.__version__ )"
4.5.5インストールの確認は上記コマンドで確認できます。「4.5.5」がインストールされました。
imutilsのインストール
「imutils」は翻訳、回転、サイズ変更、スケルトン化、Matplotlib画像の表示などの基本的な画像処理機能を簡単に行うための一連の便利なユーティリティモージュールです。画像解析などの場面ではよく使うのでインストールしておきましょう。
pip install imutilsさて、これでPythonとOpenCVを使った画像解析ができる環境が整ったので、それでは早速画像解析のコードを書いていきましょう。
4. 顔の検出
OpenCVの画像検出には「Haar-Like特徴量」というアルゴリズムを使いますが「カスケード分類器」と呼ばれる学習データ(xml)が必要となります。この学習データは自分で用意することもできるのですが、自前で準備するには最低でも数千枚の教師画像が必要になり、検出精度はこの教師画像の多さに比例します。いきなりカスケード分類器を用意するのはちょっと敷居が高いので、今回はお手軽に標準の分類器を用いたいと思います。下記のような分類器が公開されています。
GitHub opencv/data/haarcascades/
https://github.com/opencv/opencv/tree/master/data/haarcascades
- haarcascade_eye.xml
- haarcascade_eye_tree_eyeglasses.xml
- haarcascade_frontalcatface.xml
- haarcascade_frontalcatface_extended.xml
- haarcascade_frontalface_alt.xml
- haarcascade_frontalface_alt2.xml
- haarcascade_frontalface_alt_tree.xml
- haarcascade_frontalface_default.xml
- haarcascade_fullbody.xml
- haarcascade_lefteye_2splits.xml
- haarcascade_licence_plate_rus_16stages.xml
- haarcascade_lowerbody.xml
- haarcascade_profileface.xml
- haarcascade_righteye_2splits.xml
- haarcascade_russian_plate_number.xml
- haarcascade_smile.xml
- haarcascade_upperbody.xml
これら分類器のうち人の顔の検出で使えるのは「frontalface」と名前が付いたものですが、今回は「haarcascade_frontalface_default.xml」を使ってみます。
サンプルコード
# -*- coding: utf-8 -*-
from imutils import paths
import argparse
import cv2
import os

# 解析画像対象フォルダ
TARGET_PATH = 'images'

# Haar-Like特徴量で顔を検出
def face_recognition(gray):
	face_cascade = cv2.CascadeClassifier('haarcascade_frontalface_default.xml')
	return face_cascade.detectMultiScale(gray, scaleFactor=1.1, minNeighbors=15, minSize=(20, 20))

# 検出レポート描画
def report_image(image, faces):
	# 顔の検出レポート
	if len(faces):
		for index, (x, y, w, h) in enumerate(faces):
			cv2.rectangle(image, (x, y), (x + w, y + h), (255, 0, 0), 1)

def crop_recognition(gray, targets):
	return [gray[y: y + h, x: x + w] for x,y,w,h in targets]

def resize_image(image):
	height, width = image.shape[:2]
	while width >= 2400:
		image = resize_image_to_harf(image)
		height, width = image.shape[:2]
	else:
		return image

def resize_image_to_harf(image):
	return cv2.resize(image,None,fx=0.5, fy=0.5)

def write_image(file_path, image, sub_dir, suffix=''):
	dir_file = os.path.split(file_path)
	dir = dir_file[0]
	file_name = dir_file[1]

	if sub_dir != './':
		report_dir = dir + sub_dir
	else:
		report_dir = dir

	root, ext = os.path.splitext(report_dir + '/report_of_' + file_name)
	export_file_path = root + suffix + ext

	os.makedirs(report_dir, exist_ok=True)
	cv2.imwrite(export_file_path, image)

# メイン関数
def main():
	for image_path in paths.list_images(TARGET_PATH):
		original_image = cv2.imread(image_path)
		image = resize_image(original_image)
		gray = cv2.cvtColor(image, cv2.COLOR_BGR2GRAY)

		faces = face_recognition(gray)

		if len(faces):
			face_images = crop_recognition(gray, faces)

			for index, face_image in enumerate(face_images):
				write_image(image_path, face_image, '/faces', '_' + str(index))

		report_image(image, faces)
		write_image(image_path, image, './')

if __name__ == '__main__':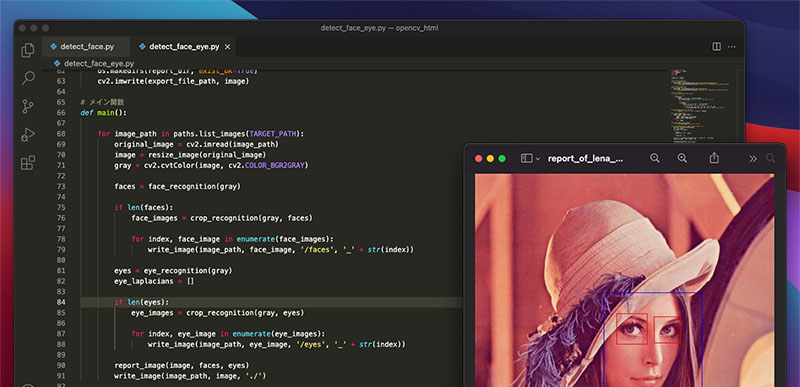
main()このコードを実行してもらうと「image」フォルダに入っている複数の画像を次々に解析して、顔が検出できた場合「report_of_」という接頭辞のついた新たな画像が生成されます。レポート画像内の「顔」には、1pxの太さの枠が描画されます。また、解析に使用したグレースケール画像は別途「face」というサブディレクトリ内に格納されます。
11行目:
「face_recognition」という関数ですが、Haar-Like特徴量という手法で検出が行われますが、そのために必要なカスケード分類器「haarcascade_frontalface_default.xml」を読み込んで検出を行なっています。検出にはグレースケール画像の方が適しているので、main関数内57行目でグレースケールに変換した画像を引数で渡しています。
16行目:
「report_image」という関数内で、検出された顔の枠線が描画されます。

こんな感じで顔の部分に矩形が描画されれば成功です。
5. 目の検出
今度は顔の検出と同時に目の検出も行ってみたいと思います。先程のサンプルコードに目の検出部分を書き加えてみました。なお「目」の検出には「haarcascade_eye.xml」というカスケード分類器が必要となるのでダウンロードしておいてください。
# -*- coding: utf-8 -*-
from imutils import paths
import argparse
import cv2
import os
# 解析画像対象フォルダ
TARGET_PATH = 'images'
# Haar-Like特徴量で顔を検出
def face_recognition(gray):
face_cascade = cv2.CascadeClassifier('haarcascade_frontalface_default.xml')
return face_cascade.detectMultiScale(gray, scaleFactor=1.1, minNeighbors=15, minSize=(20, 20))
# Haar-Like特徴量で目を検出
def eye_recognition(gray):
eye_cascade = cv2.CascadeClassifier('haarcascade_eye.xml')
return eye_cascade.detectMultiScale(gray, scaleFactor=1.2, minNeighbors=5, minSize=(10, 10))
# 検出レポート描画
def report_image(image, faces, eyes):
# 顔の検出レポート
if len(faces):
for index, (x, y, w, h) in enumerate(faces):
cv2.rectangle(image, (x, y), (x + w, y + h), (255, 0, 0), 1)
# 目の検出レポート
if len(eyes):
for index, (ex, ey, ew, eh) in enumerate(eyes):
# 顔以外の領域で検出されたものは無視
if x < ex and (x + w) > ex and y < ey and (y + h) > ey:
cv2.rectangle(image, (ex, ey), (ex + ew, ey + eh), (0, 0, 255), 1)
def crop_recognition(gray, targets):
return [gray[y: y + h, x: x + w] for x,y,w,h in targets]
def resize_image(image):
height, width = image.shape[:2]
while width >= 2400:
image = resize_image_to_harf(image)
height, width = image.shape[:2]
else:
return image
def resize_image_to_harf(image):
return cv2.resize(image,None,fx=0.5, fy=0.5)
def write_image(file_path, image, sub_dir, suffix=''):
dir_file = os.path.split(file_path)
dir = dir_file[0]
file_name = dir_file[1]
if sub_dir != './':
report_dir = dir + sub_dir
else:
report_dir = dir
root, ext = os.path.splitext(report_dir + '/report_of_' + file_name)
export_file_path = root + suffix + ext
os.makedirs(report_dir, exist_ok=True)
cv2.imwrite(export_file_path, image)
# メイン関数
def main():
for image_path in paths.list_images(TARGET_PATH):
original_image = cv2.imread(image_path)
image = resize_image(original_image)
gray = cv2.cvtColor(image, cv2.COLOR_BGR2GRAY)
faces = face_recognition(gray)
if len(faces):
face_images = crop_recognition(gray, faces)
for index, face_image in enumerate(face_images):
write_image(image_path, face_image, '/faces', '_' + str(index))
eyes = eye_recognition(gray)
if len(eyes):
eye_images = crop_recognition(gray, eyes)
for index, eye_image in enumerate(eye_images):
write_image(image_path, eye_image, '/eyes', '_' + str(index))
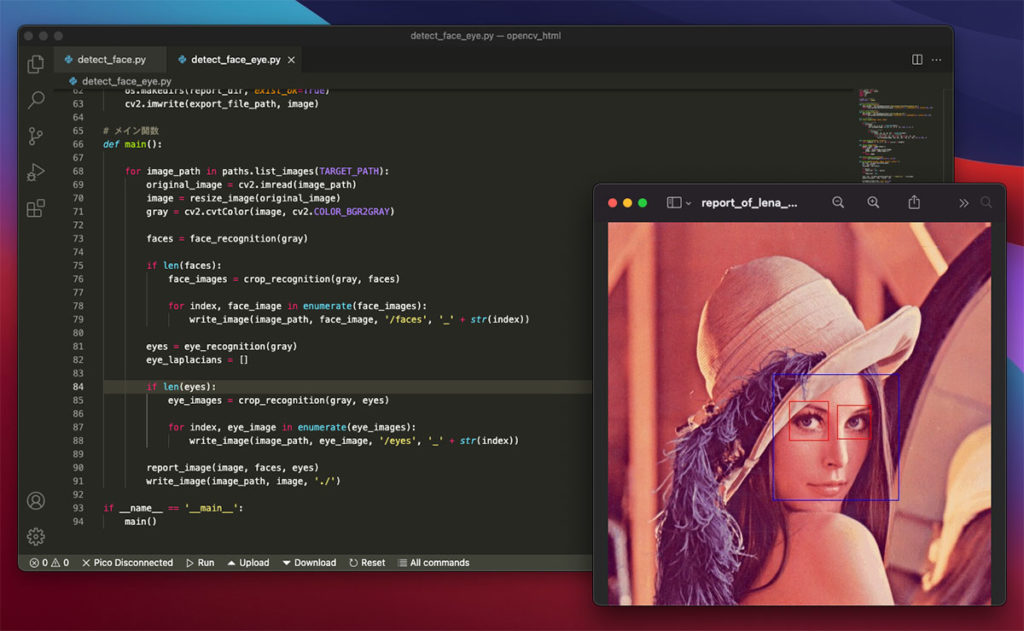
report_image(image, faces, eyes)
write_image(image_path, image, './')
if __name__ == '__main__':
main()16行目:
「eye_recognition」という目を検出する関数を加えてありますが、ここで「haarcascade_eye.xml」を読み込んでおきます。
21行目:
「eye_recognition」関数は「report_image」から呼ばれますが、一つ注意点があります。29行目以降の検出された「目」の矩形描画の部分ですが、検出された「目」は顔の範囲内しか描画しないようにしておかないと、顔以外の部分で「目」が誤認されてしまった時におかしなことになってしまうのです。「目」の検出は「顔」よりも特徴量が少ないためか、誤認が多くなる傾向があるのでこのような工夫が必要になってきます。

6. まとめ
今回はOpenCVを使った画像解析を今一度おさらいしてみました。OpenCVなどの機械学習分野のプログラミングは大変奥が深く、一口に語れるものではないですが、プログラミングってどんな分野でも、まずはプログラムを動かすことの楽しさを味わうことが第一歩としては大事かなと思っています。理解が深まったら、さらに知りたい部分を深掘りしていけばいいわけですしね。
とにかくOpenCVって深いですね。顔認識の分野ではAmazon RekognitionやMicrosoft Azure Face APIなど、解析精度が大変優れたサービスもあるのですが、アルゴリズムにより近い部分に触れられるOpenCVの方が機械学習による画像解析の基本を学べると思います。自分にとっても、今後もさらに研究していきたい分野です。
参考サイト:
ピンボケや手ぶれ写真を機械的に検出する方法 – ポートレート編
https://hiroki.jp/detect_blur_by_face